
Yogurt has many uses in the pureed diet. In my experience, a lot of elderly folks do not have any history of eating yogurt and have an impression about it, usually negative. I feel it is a great beneficial food to add to a pureed diet and encourage caregivers to try adding it to their recipes and trial it with their loved ones.
Although yogurt has been around in the U.S. for many decades, I didn’t even grow up eating it. Truthfully, I did not like the taste of the healthier greek yogurts and only in later years when I started making smoothies did I start eating it.
There are many types of yogurts on the market, many flavors and lots of convenient options. A word of caution, however, that many brands of yogurt have substantial amounts of sugar in them. Be aware and read the labels if that is a dietary restriction for you. Also, if your loved one is on a smooth pureed diet, many varieties have added fruit, nuts, granola or other foods mixed in.
As with all other groceries, the price of yogurt continues to rise. I go through a quart of yogurt a week and the low sugar healthy options I was buying is reaching over $7.00 price mark. I wasn’t happy with the sugar content even in these and along with the price increases, I decided to look into making it myself.
To my surprise, it is extremely easy to make at home and I have been thrilled with the outcome! I have complete control over what I add to it for sweetening and/or for flavoring. I haven’t experimented much with different flavors, as I use my yogurt pretty exclusively for smoothies, so the plain unsweetened yogurt is a perfect base for any fruits I add to it.
What You Need To Make Yogurt At Home:
Making yogurt at home requires very few items. These items include:
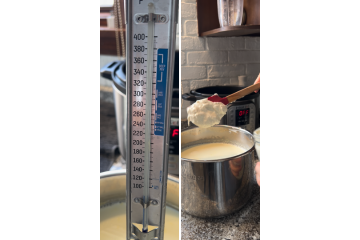
- thermometer
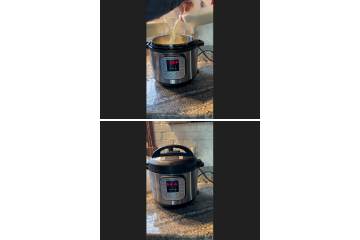
- large pot, instant pot or crock pot
- large mixing bowl
- large strainer
- cheese cloth, yogurt strainer or nut milk bag
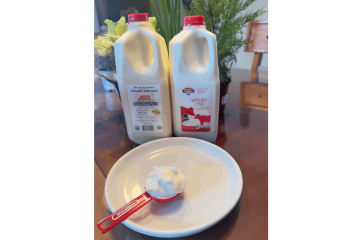
- 1 gallon milk
- 2 tablespoons plain yogurt that has active or live cultures
Steps To Making Yogurt At Home:
 Step 1: Yogurt
Add one gallon of milk to your pot.
Heat milk to 180 degrees, being careful not to burn it, stirring often. Remove from heat.
Notes: My instant pot has a yogurt setting. The yogurt button is pushed until it reads “boil.” Once it reaches this temperature, the pot will beep to let you know. I then have to heat it longer on “sauté” setting until the temperature reaches 180 degrees. Read the instructions for your instant pot when using the yogurt setting as it may be different from mine.
This step can easily be done on the stove top or even in a crock pot. Simply heat up one gallon of milk slowly to desired temperature (180 degrees). I personally use whole milk or raw milk when I can get it. However, from what I have read online, you can use low fat milks and even plant based milk , but I have no experience to comment here using anything other than whole milk.
 Step 2: Yogurt
Set aside and let milk cool. Needs to cool below 110 degrees.
Next, add 2 tablespoons of plain yogurt and stir in.
Place pot back to the instant pot and set for 10 hours on the yogurt setting. It is not heating it, just incubating it.
Notes: I let my milk cool on the counter. Some people will set the pot into a cold water bath to get it to cool quicker.
On the surface of the milk, a film will form. Simply take a fork or spoon and skim it off and discard.
If you are using a pot on the stove top or a crock pot ,after adding the yogurt, wrap the covered pot in towels, set aside on counter and set a timer for 8-10 hours.
After 8-10 hours you have made yogurt! The longer you let it set, the firmer it will be.
At this stage, you can add flavorings (i.e., vanilla, almond, herbs, chocolate) and sweeteners of choice (i.e., sugar, artificial sugars, maple syrup, honey) and other extras such as fruit, jams etc,.
After adding your ingredients and stirring them in, store your yogurt in airtight containers in the refrigerator.
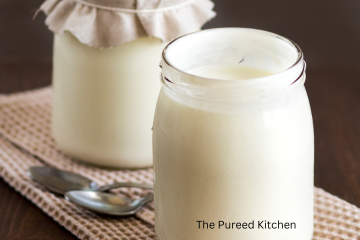
BUT.……..IF you want to make greek yogurt, you have one more step before you add your flavorings and sweeteners! Greek yogurt goes through an extra straining process to remove the whey (a liquid that contains lactose).
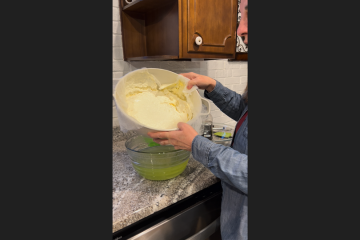
Step 3: Greek Yogurt
Line your strainer with cheesecloth.
Place your strainer over a large bowl.
Pour the yogurt into the strainer.
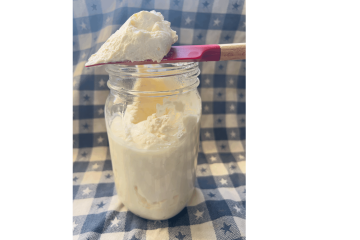
Set aside for 2-3 hours or more. Yogurt will get thicker the longer you let it set. I’ve placed in the refrigerator and left to strain overnight and it comes out thick like sour cream. The whey will strain into the bottom bowl.
Congratulations!! You’ve made your very own greek yogurt!! Add flavorings and/or sweeteners of choice. Store in airtight containers in the refrigerator.
Notes: Greek yogurt is thicker, creamier and has a tart taste.
According to nutritionists, greek yogurt has fewer carbohydrates, more protein (almost double), a great source of calcium and lower sugar than regular yogurt. Greek yogurt has probiotics from the live and active cultures.
Save the whey! It can be used as a starter for your next batch of yogurt, among other things. Check out this post for more uses of whey.
https://www.luvele.com/blogs/recipe-blog/great-ways-to-use-whey-from-yogurt
Ways To Use Yogurt:
Yogurt isn’t just for smoothies. There are many ways to incorporate yogurt into your cooking to add great nutritional value, moistness and flavor into your recipes.
Some examples include: Smoothies – Cakes – Popsicles – Frozen Yogurt – Salad Dressings – Sauces – Marinades – Dips – Breads – Yogurt Bark – Over Night Oats – Soups – and on and on …………….
KEEP AT LEAST 2 TABLESPOONS OF YOUR YOGURT TO MAKE YOUR NEXT BATCH. NEVER RUN OUT OF YOGURT AGAIN!
Now that I am making my own yogurt, it has gotten me more curious and inspired about the many ways I might use it in my own cooking. I hope this blog is motivating for you to try your hand at making your own yogurt. Let us know if you did! I’ll follow up with more recipes as I experiment myself.
You can see me on YouTube making greek yogurt here:
https://www.youtube.com/watch?v=uMrNew0vx1g
If you haven’t yet subscribed to my Youtube Channel, please consider.
Many Blessings,
Jean